Filippo Negroli - master of steel repoussage

3 700 26
Filippo Negroli - master of steel repoussage
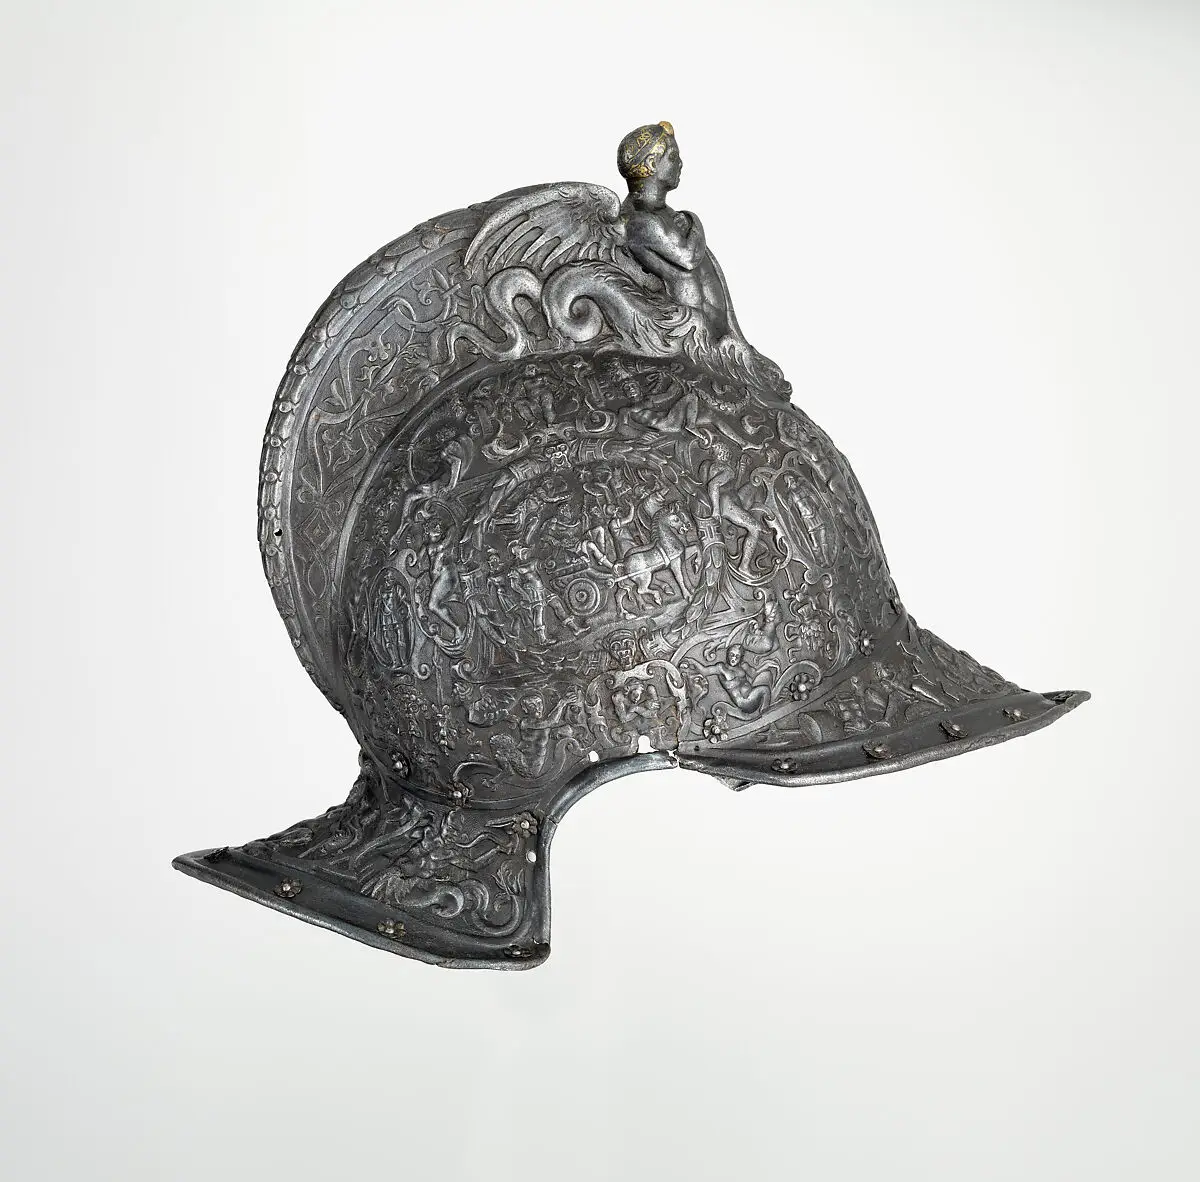
Burguignon, circa 1545–1550, Milan. Height 26,8 cm, width 22,9 cm, diameter 35,6 cm. Weight 1651 g. This model is very similar to two helmets by Filippo and Francesco Negroli, held in Madrid and Paris. Later cleaning has lost the original dark surface and damask trim of this helmet. Metropolitan Museum of Art, New York


For in His hand are we and our words and all understanding and skill in doing things.
The Book of Wisdom of Solomon, 7:16


Tales of Armor and weapons. Today's article in a series devoted to the armor and weapons of the Middle Ages and the modern era will focus on Filippo Negroli (1510–1579), a distinguished master armorer of the modern era who created unique examples of protective armor. Indeed, calling them "protective" would be a stretch, although, being made of metal, they could certainly have had protective functions. However, the main feature of his armor was something entirely different: the highest level of metalworking combined with artistic flair. All of his works, without exception, are considered among the most impressive examples of European Renaissance armor culture.

The revival of interest in classical culture during the Renaissance greatly influenced the appearance of armor. Inspired by Roman models, Italian princes and condottieri began wearing armor in the classical style (all'antica) to evoke ancient heroes and their glorious military heritage. Although classical-style armor was already known in the 15th century, it was only around 1530 that armorers began making it from stamped steel. Because the relief decoration was raised, the steel plates were too thin and could not provide protection. As a result, stamped armor served a purely ceremonial function, and armorers were free to fashion it into the most fantastical, often bizarre, shapes.

Filippo Negroli of Milan (c. 1510–1579) was arguably the main innovator of this style, and his works were considered masterpieces of gunsmithing by his contemporaries. Negroli's workshop included Filippo's brother Francesco, a specialist in damascene (inlaying gold and silver into iron or steel), and his cousin Giovanni Paolo. Their patrons included the leading art connoisseurs of the time, kings, and emperors.
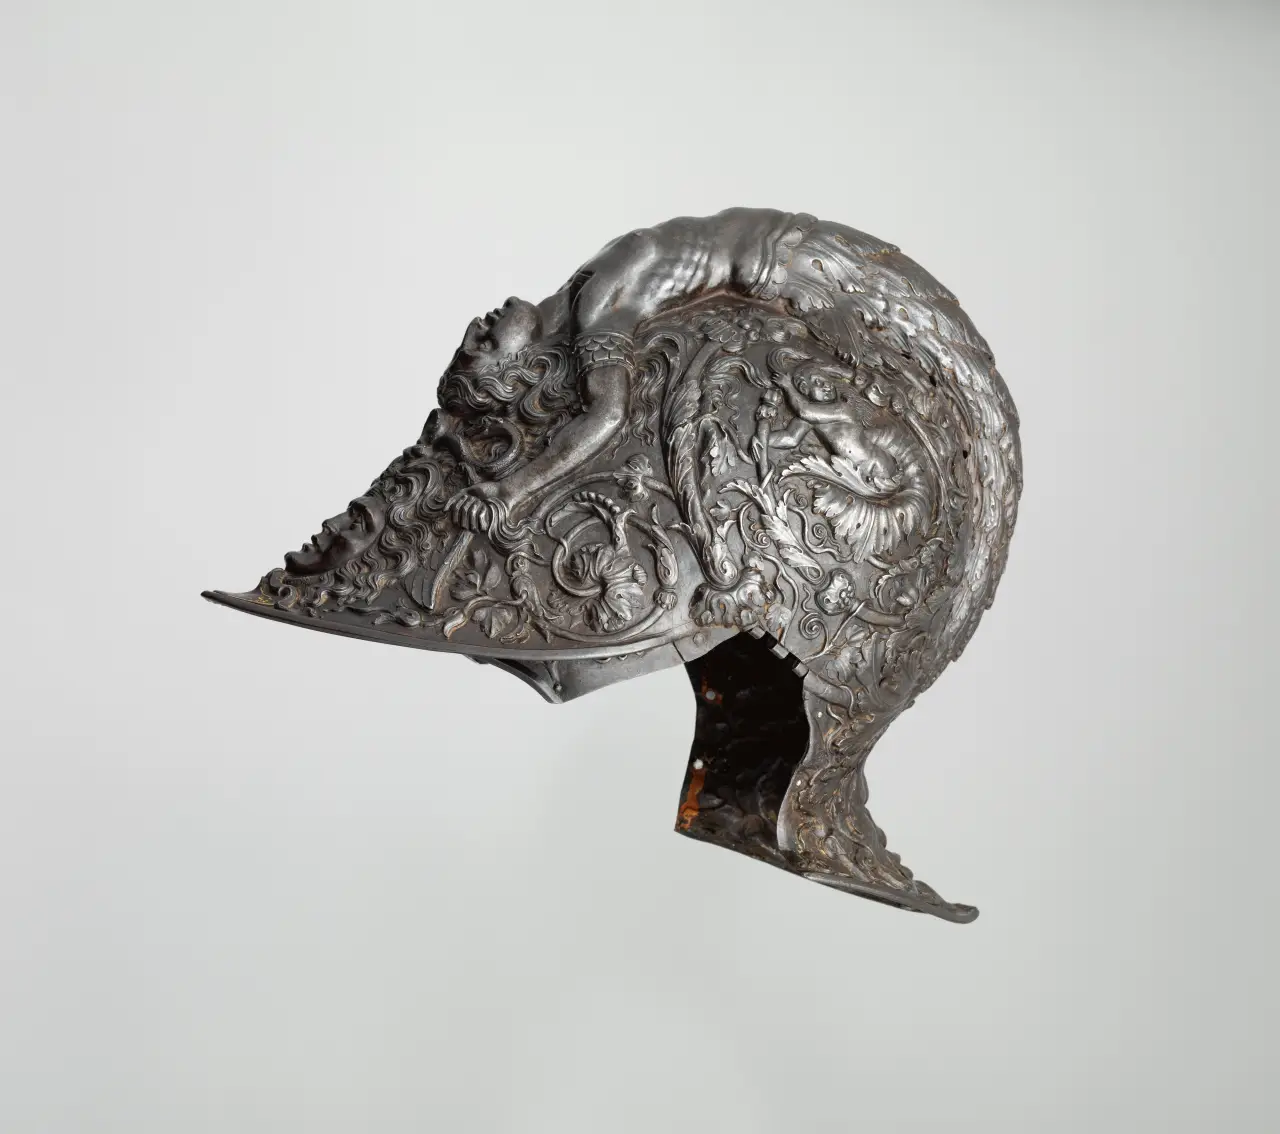

Burguignon by Filippo Negroli, 1543. Height 24,1 cm. Width 18,6 cm. Diameter 29,2 cm. Weight 1871. Metropolitan Museum of Art, New York. This masterpiece of Renaissance goldsmithing bears the signature of Filippo Negroli on the forehead guard. Sixteenth-century writers called his relief armor "marvelous" and worthy of "immortal fame." The helmet's bowl, crafted from a single sheet of steel and patinated to resemble bronze, is decorated with relief motifs inspired by classical art. A graceful, mermaid-like siren, forming the helmet's crest, holds the grimacing head of the Gorgon Medusa by the hair. The sides of the helmet are decorated with acanthus scrolls, on which putti are depicted. This motif harks back to ancient Roman sculpture and wall paintings.
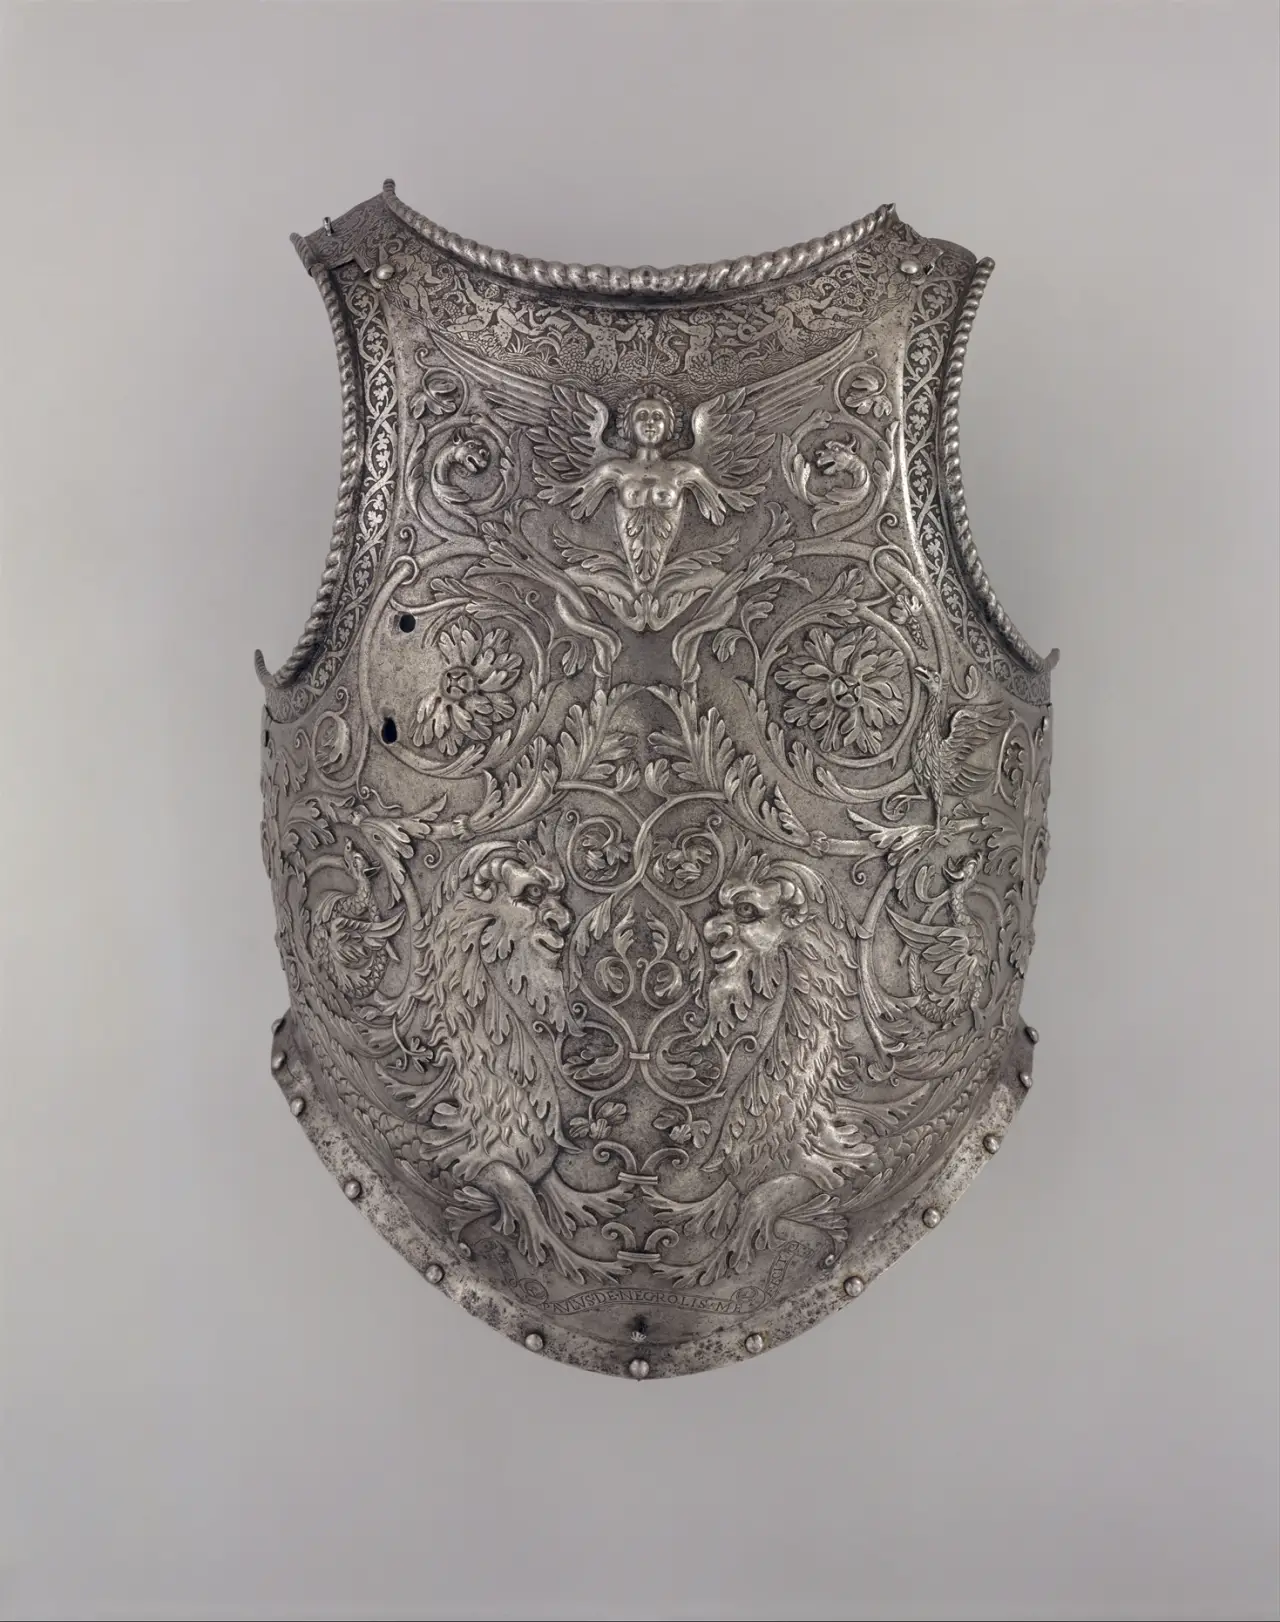

The breastplate, formerly part of a ceremonial suit of armor, is the only signed work by Giovanni Paolo Negroli, a cousin of the more famous Filippo Negroli. The breastplate's surface was originally reddish-brown, and the raised and engraved areas were gilded. Its color was likely very similar to that of the helmet, also attributed to Giovanni Paolo.

Negroli worked for the most influential people of his time, including European monarchs and members of the highest feudal nobility. The weapons and armor created by Negroli were considered symbols of status and power; they weren't simply used in battle (though they were used!), but also served primarily as a symbol of prestige at parades and ceremonies.

Negroli was by no means alone. It was a family of hereditary gunsmiths, of whom there were many in Milan. Each family had its own professional secrets, its own unique experience, and its own reputation among both its peers and its customers.
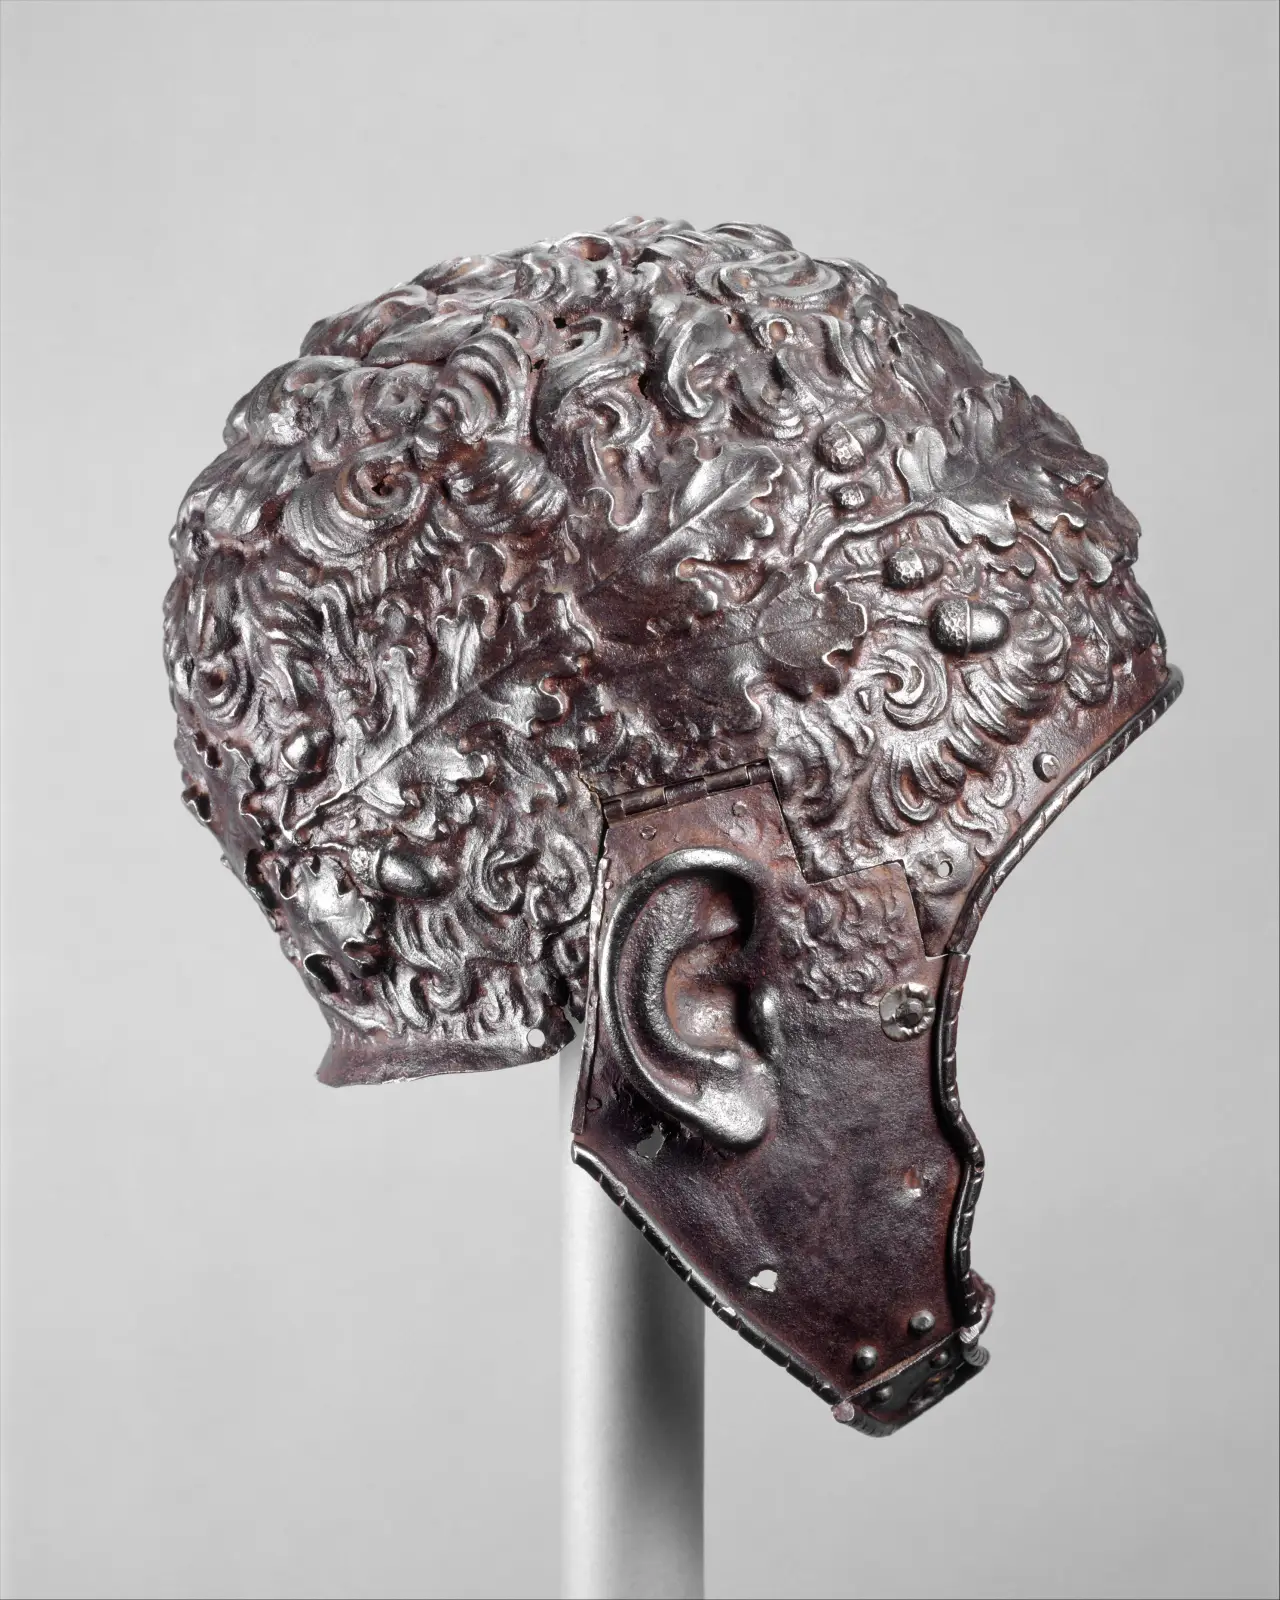

An antique-style helmet by Filippo Negroli, c. 1532–35. Height 35 cm, width 20,9 cm, diameter 22,7 cm. Weight 964 g. Metropolitan Museum of Art, New York. This helmet, resembling a head with tightly braided hair crowned with oak leaves, alludes to an ancient hero, possibly a Roman emperor. The mention of oak (rovere in Italian) may indicate that the helmet was made for a member of the della Rovere family, the Dukes of Urbino. The cheekpieces were likely added in the 19th century.

Filippo Negroli had younger brothers, Giovanni Battista (1511–1591) and Francesco (1522–1600), who worked in the workshop owned by their father, Gian Giacomo Negroli (1463–1543). Filippo specialized in chasing, while his brother Francesco inlaid armor with gold and silver.

Negroli gained fame for his mastery of metal chasing, which he skillfully applied to create exquisite and intricate designs on his armor. Filippo specialized in repoussage armor. Repoussage is a metalworking technique that involves hammering the metal from the reverse side, creating low-relief patterns. Stamping, or embossing, is a similar technique in which the piece is hammered from the front, deepening the metal. These two techniques are often used simultaneously. And it was by combining these two techniques that Filippo Negroli achieved unprecedented perfection. Filippo's pieces are considered particularly remarkable because they were crafted from steel, rather than the softer iron traditionally used for ceremonial armor.

How else did Negroli's work differ from that of other masters? First and foremost, Negroli drew inspiration from ancient mythology, creating helmets and breastplates depicting mythical creatures, battle scenes, heroes, and gods. This wasn't particularly innovative, but his armor was forged from steel, which was unusual for Italian armorers of the time. What was most unusual were his helmets, with their abundance of detail, such as curls of hair on the beard and head, and large figures of mythical creatures intertwined with floral designs.

He made ceremonial armour for such distinguished clients as Charles V, Holy Roman Emperor (Royal Armoury Collection, Madrid), the "Armor of the Dauphin", the future King Henry II, which Filippo made in collaboration with Francesco Negroli, ca. 1510–1579 (Army Museum in Paris), as well as burgundy helmets from the Metropolitan Museum of Art in New York, the Art Museumhistorical Museum of Vienna and the Wallace Collection in London.
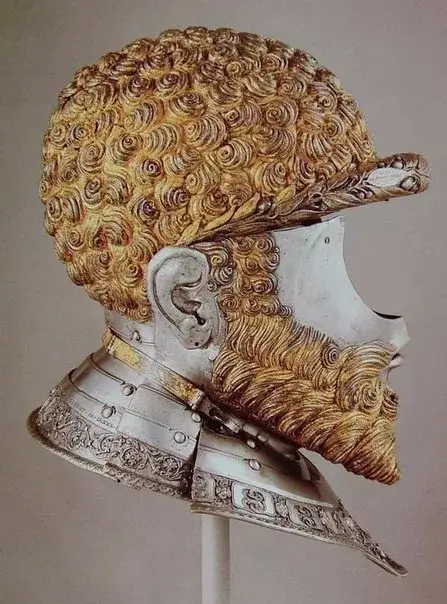

A ceremonial helmet for Holy Roman Emperor Charles V from the Royal Armory Collection in Madrid. Dating back to the early 1530s, the helmet is part of a ceremonial suit of armor. The helmet is clearly sculpted, designed for frontal viewing only, and does not allow for active head movement. Some design features include: the dome is crafted with a three-dimensional image of gilded "curls," and the face has a similar "beard." Natural human "ears" with ear holes are crafted on the sides. On the movable gorget, Negroli created a three-dimensional image of the chain and insignia of the Order of the Golden Fleece, as the emperor was the honorary master of this most prestigious European order. On the back of the gorget are images of two griffins holding a round heraldic shield depicting the Pillars of Hercules beneath the imperial crown. The helmet's dimensions are 295 x 264 x 341 mm. Weight: 2355 g. There is no documentary evidence that this particular helmet was used during a specific ceremony with a fixed date. It is also unknown whether this helmet was worn by Charles V himself or if it was intended for display without his personal use. The inscription on the helmet: • IAC • PHILIPPVS • NEGROLVS • MEDIOLAN • FACIEBAT • M • D • XXX • III (Jacobo Filippo Negroli from Milan made [this] in 1533). The antique motifs in the design of the helmet are not accidental - this is a Renaissance interpretation, understandable to the educated elite of the time. Charles V was presented as the heir of the Roman emperors, and not simply as a king or a military leader

Negroli also produced a complete rondel shield: a round shield with a three-dimensional image of a lion's head at its center. A wide band with gilded images of griffins surrounded by floral patterns runs around the shield's circumference.

In the 1530s and 1540s, Milanese armorers specialized in classical-style helmets with high relief carvings, sometimes depicting fantastical creatures. Unlike engraving, embossing thinned and weakened the steel, reducing its protective properties, so this technique was primarily used for ceremonial armor. Many craftsmen produced armor all'antica ("in the antique style"), attempting to imitate the steel of both Filippo Negroli himself and his brother Giovanni. German craftsmen also made helmets and armor in a similar style, and they also copied the Negroli brothers!
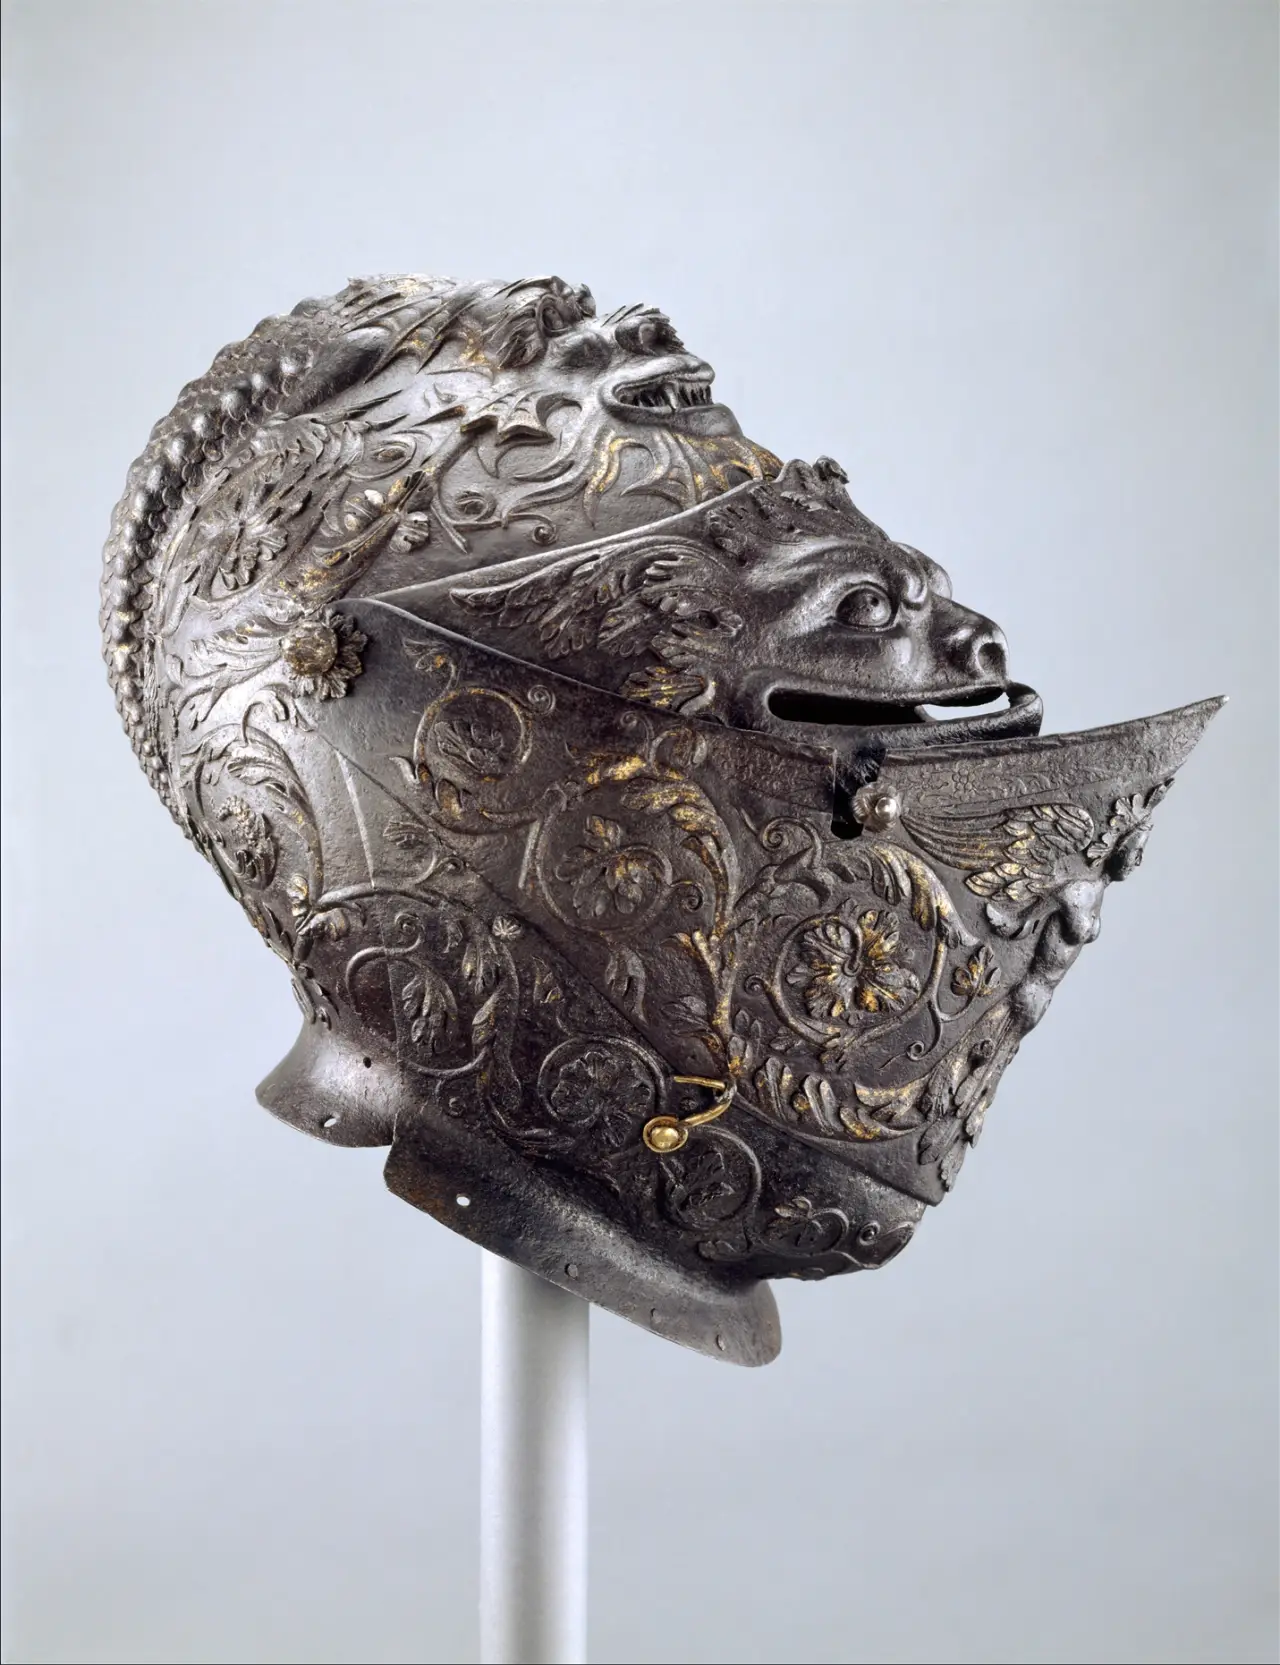

"Closed Helmet," attributed to Giovanni Paolo Negroli, ca. 1540–1545. This helmet is very similar in design and workmanship to a breastplate signed by Giovanni Paolo Negroli in the Metropolitan Museum of Art's collection, so it can be confidently attributed to him. Material: steel. Height 27,3 cm, width 29,2 cm, diameter 38,1 cm); weight 3068 g. The Metropolitan Museum of Art, New York
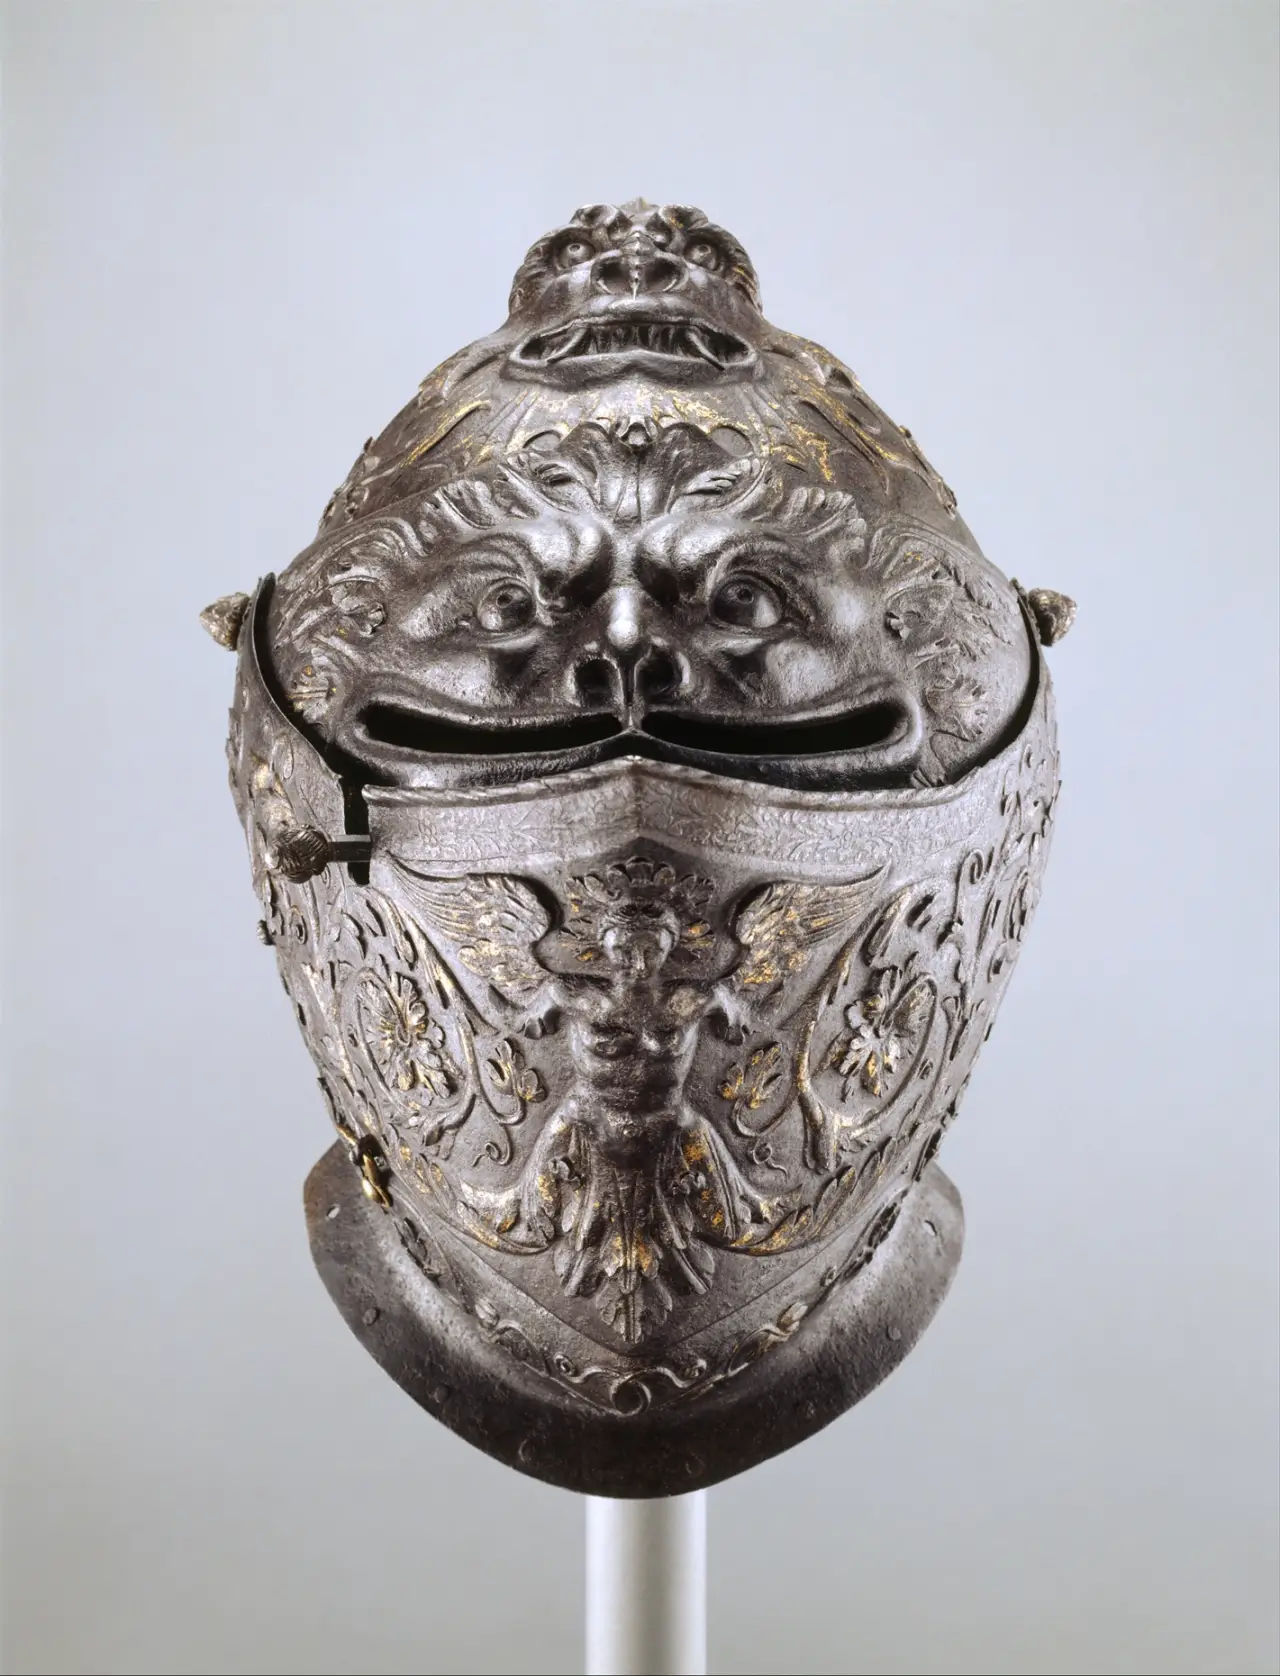

A helmet by Giovanni Negroli. Front view. What an impressive face, isn't it?!
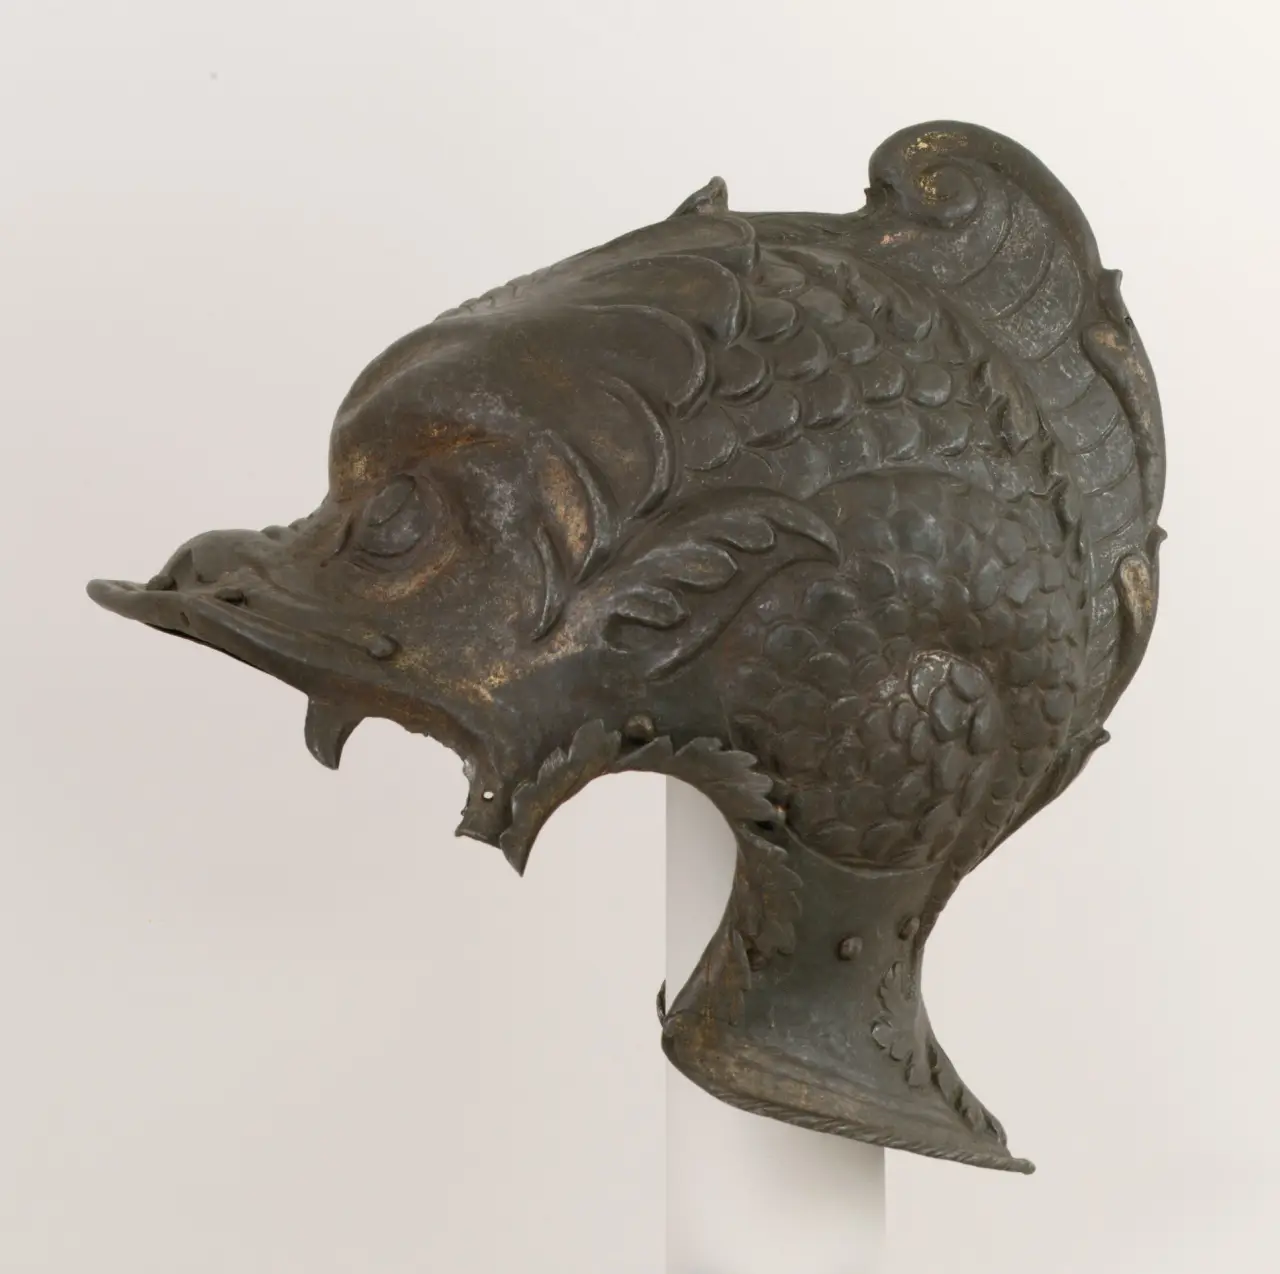

Helmet in the classical style. A crude imitation of Negroli's work. Metropolitan Museum of Art, New York.
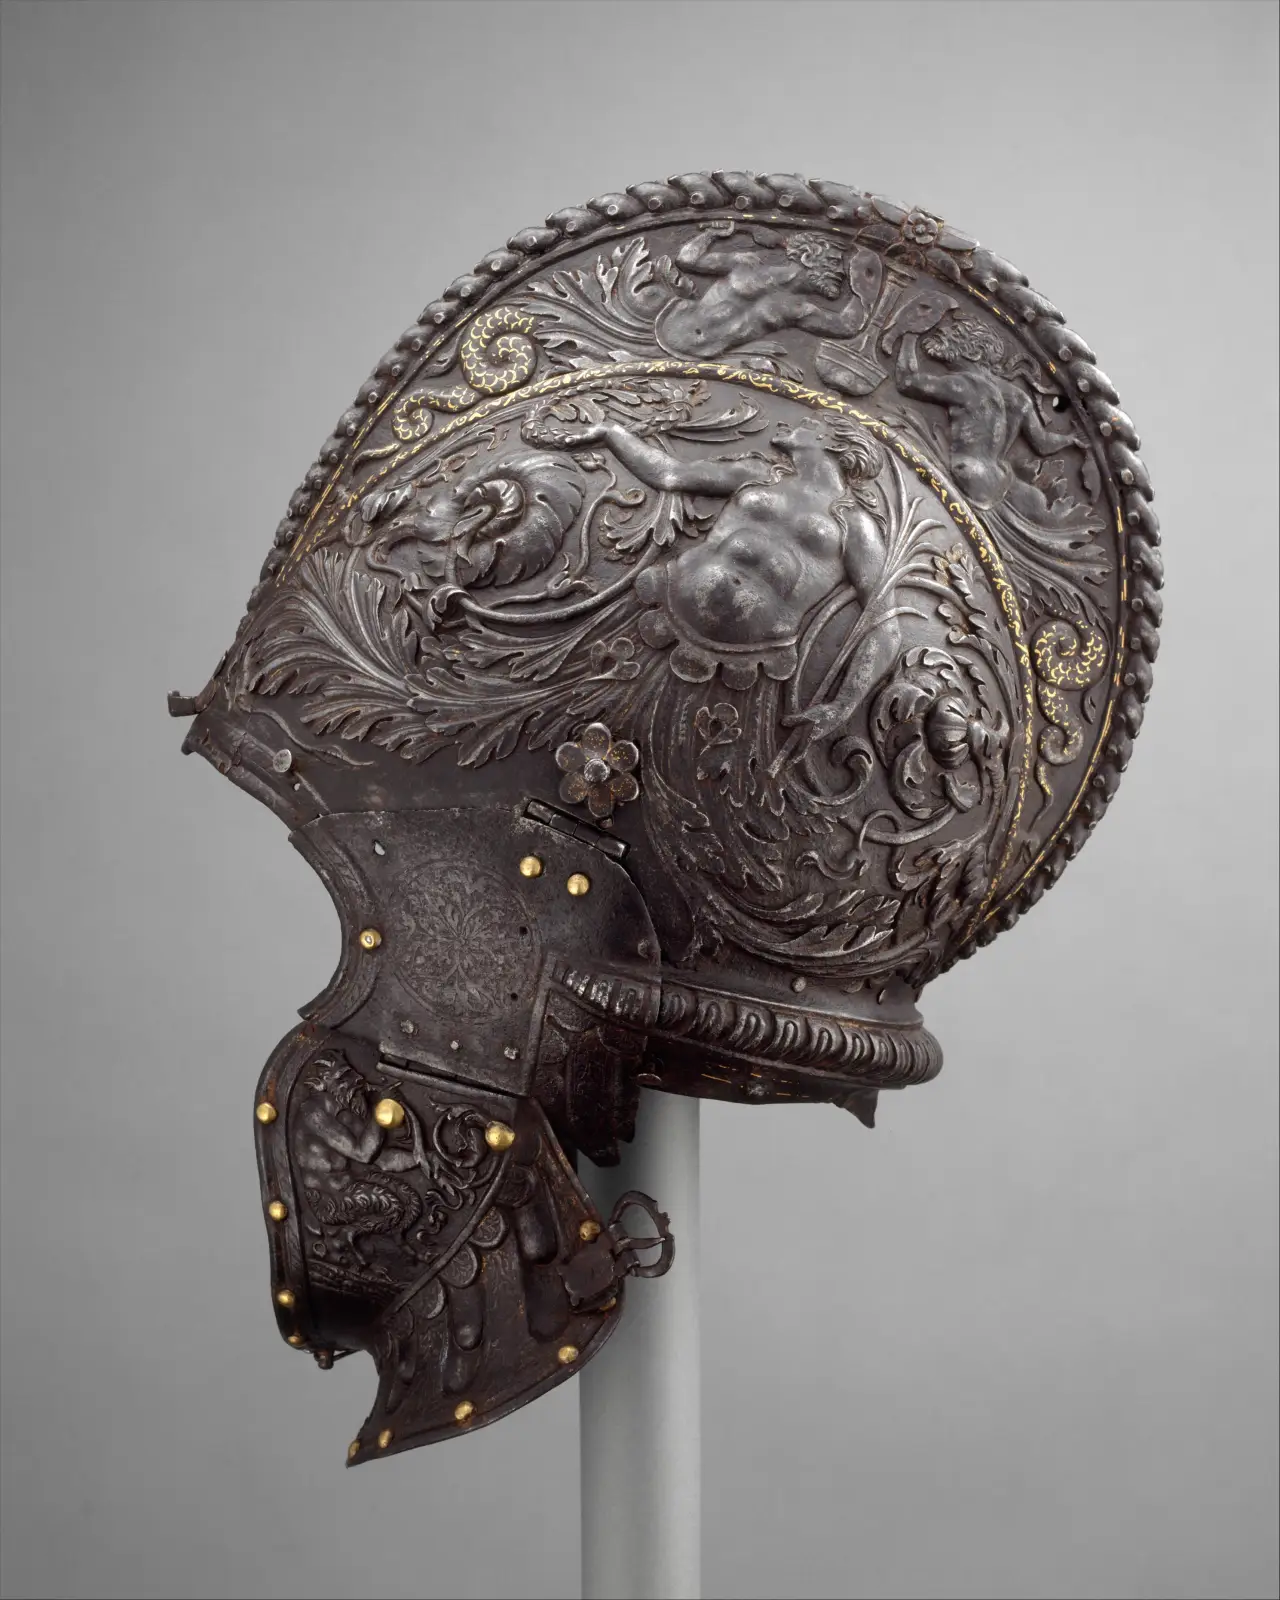

"High-Crested Bourgignot," circa 1550-1555. Imitation of Negroli. Height 39,4 cm. Crest height 6,4 cm. Width 22,9 cm. Diameter 27,9 cm. Weight 2069,5 g. Allegorical figures of Glory and Victory are engraved on the sides of the bowl. The helmet was originally equipped with a movable visor and plates on the back. Metropolitan Museum of Art, New York.

Bourgignot, c. 1550–1555, Augsburg. Attributed to Desiderius Helmschmid. Height 28,6 cm, width 22,3 cm, diameter 38,1 cm. Weight 2126 g. Metropolitan Museum of Art, New York

What can we say in conclusion? Fashion has always existed. And there have been those who followed it blindly or imitated recognized masters. But there have also been those who, within the confines of this fashion, rose to the heights of creativity and created true masterpieces.
26 comments
Information
Dear reader, to leave comments on the publication, you must sign in.
  1. +2
    16 March 2026 07: 53
    Unlike engraving, embossing thinned and weakened the steel, reducing its protective properties,

    This is an illiterate statement. Engraving also weakens steel, especially deep engraving.
  2. +3
    16 March 2026 08: 25
    Moreover, Filippo's pieces are considered particularly remarkable because they were made of steel, rather than the softer iron traditionally used in ceremonial armour.

    This has been stated many times already. But during any heat treatment in a forge, iron is saturated with carbon from charcoal and turns into forged Iron, which is also iron with carbon, only with a low carbon content. True smeltable steel wasn't made until the 19th century. All armor was made of wrought iron, or if the surface layer was carburized, it was "reinforced." There was, of course, a technology called the Brussels method, which involved adding scrap iron to molten pig iron, but that was after the invention of the blast furnace in the 15th century.
  3. +1
    16 March 2026 10: 24
    What can we say in conclusion? Fashion has always existed. And there have been those who followed it blindly or imitated recognized masters. But there have also been those who, within the confines of this fashion, rose to the heights of creativity and created true masterpieces.

    What does fashion have to do with it?
    For one, it is enough to simply have a helmet, but for another, it must be not only gilded, but also embossed and engraved...
    Just like today, for one person, a Granta is a "sweet spot" car, while for another, it's no less a Skoda...
    And speaking of weapons, take a look at the weapons companies in Italy today...
    How many of them are there - and what kind of weapons do they create and produce?
  4. +4
    16 March 2026 12: 39
    I didn't like the antique-style helmet. And the red one, too. It looks like my head is covered in warts.
    Well, that's the kind of connoisseur of helmet art I am.
    The other helmets are pretty cool. I'd wear them with pleasure, especially considering my hairlessness.

    I'm just kidding, just kidding!
    This is what Monday means! Everyone is gloomy and extremely dissatisfied)))
    Hi all!
    good drinks love )))
  5. +2
    16 March 2026 12: 54
    Thanks for the article. Excellent illustrations, really enjoyed them.
    A graceful, mermaid-like siren, forming the crest of the helmet, holds the grimacing head of the Gorgon Medusa by the hair.

    It seemed to me that the owner of this helmet experienced no less pleasure when he held it in the crook of his left arm, just as they hold caps today).
  6. +2
    16 March 2026 17: 15
    Filippo specialized in repoussage on armor. Repoussage is a metalworking technique that involves shaping metal by chasing it on the reverse side, creating low-relief patterns.
    This statement, while correct, is not entirely accurate. This issue has been widely discussed in the specialized literature. Repoussage and Filippo Negroli's reverse coinage appear similar at first glance, but despite their superficial similarities, there are profound technical and philosophical differences between them.
    Let's start with the fact that repoussage is a low relief, while Negroli's works are sculptural high relief.
    The artistic philosophy of the piece is also different. Repoussage is the decoration of metal. Negroli's reverse embossing is the revitalization of metal.
    He didn't simply press out a form—he infused the metal with a soul. Each stroke is like Leonardo's brushstroke. Each fold is like Vesalius's anatomy study. This isn't craftsmanship—it's sculpture in metal, achieved through a physical dialogue with the material.
    Negroli's reverse coinage is repoussage pushed to the limits of human possibility. He took an ancient technique and transformed it into high art, where metal ceases to be a material and becomes a living entity.
    This is not just “improved repoussage” - it is a new artistic language, created by one person, and still not repeated in history.
    1. +5
      16 March 2026 17: 19
      I found some time in the evening, which meant I found some materials on the technology. There are also tables, but they're so tedious to prepare for posting in the comments that I decided not to include them.
      Filippo Negroli's Armor-Making Techniques - A Step-by-Step Guide
      Step 1: Preparing the metal blank
      High-carbon steel with a thickness of 1,2–1,5 mm was used—thin but strong, with high ductility after annealing.
      The sheets were cut out according to the approximate contours of the future elements of the armor (chest, back, shoulders, etc.).
      The steel was annealed at a temperature of ~700–750 °C to relieve internal stress and increase ductility.
      Step 2: Making the Backing
      The substrate consisted of a mixture of lead (60%), beeswax (30%) and cypris rosin (10%).
      The mixture was heated to 60–70 °C, a temperature at which it became viscous, like plasticine, but not fluid.
      The backing was poured into a wooden mold that matched the shape of the armor and left to cool until it was hard but flexible.
      Step 3: Installing the steel onto the substrate
      A thin steel sheet was carefully placed on top of the substrate, tightly adhering to its surface.
      The workpiece was secured in a special frame with pre-tensioning, which prevented the metal from shifting and breaking during impacts.
      Step 4: Reverse minting (repoussé)
      The master worked from the back side, from the substrate, and not from the front.
      Hand chisels made of hardened bronze with finely polished edges rounded to fit anatomical contours (muscles, bones, draperies) were used.
      Each blow of the hammer (weight 150-300 g) slowly and precisely pressed the steel into the substrate, creating a relief on the front side.
      The number of hits per figure (for example, the face of Hercules or the arch of the back) is up to 800–1200.
      Technique: The blows were applied in a spiral, from the center to the edges, to evenly distribute the stress and avoid cracks.
      Step 5: Gradually deepen and detail
      After the initial formation of the contour, the substrate was heated again (up to 50 °C) to soften it slightly.
      The master returned to work, deepening the relief to 12–18 mm, while simultaneously smoothing the surface with small chisels.
      Details (beards, wreaths, muscles, seams) were worked with separate specialized chisels - some had a radius of curvature of less than 0,5 mm.
      Step 6: Removing the Backing
      After the embossing was completed, the armor was cooled to room temperature.
      The substrate was heated to 80–90 °C – the lead melted, the wax and rosin softened.
      The soft mass was carefully removed using wooden scrapers and brushes, without damaging the steel.
      Only deep, relief forms remained, completely preserving anatomical accuracy.
      Step 7: Finishing
      The steel surface was polished to a mirror finish using pumice, charcoal and tin.
      The edges were processed by hand, without welding or rivets, to maintain the integrity of the piece.
      The armor was not painted or patinated; the natural color of the steel was preserved, emphasizing the relief.
      Step 8: Assembly and trial fitting
      The elements were assembled using leather straps and steel hinges.
      A fitting was carried out on a living person; the fitter adjusted the fit to ensure full mobility without restrictions.
      The final test: the armor had to withstand a hammer blow without deforming – a test of strength.
      1. 0
        16 March 2026 17: 50
        It's a lot of words and it's unclear. How can I control the size of the depressions using a soft backing?
        1. +1
          16 March 2026 20: 18
          To be honest, I have some questions myself about some aspects of the technological process. I could certainly continue searching for more detailed descriptions, but I might not find them. Judging by the descriptions, no one has been able to replicate the master's work, and some important information has been lost.
          How to control the size of the depressions using a soft backing? "The question isn't entirely clear. There are videos online that illustrate the embossing of three-dimensional copper vessels. Before processing, the vessel is filled with a special thermoplastic compound. After processing, the vessel is heated again, and the compound flows out. However, the relief depth isn't that great."
          1. +1
            17 March 2026 11: 06
            To be honest, I myself have questions about some aspects of the technological process.

            This is simply an unprofessional translation by a non-specialist.
            The substrate consisted of a mixture of lead (60%), beeswax (30%) and cypris rosin (10%).

            Try melting lead with wax—ha-ha. Wax and rosin are still used in coinage today. And a lead backing, too—but not in the alloy.
            The steel surface was polished to a mirror finish using pumice, charcoal and tin.

            Pumice, coal, chalk, brick dust, etc. - everything is possible - but tin?
            In general, such things should be described and translated by specialists.
            1. +1
              17 March 2026 11: 28
              Yes, it's unclear. However, the following text partially reconciles it with reality.
              The J. Paul Getty Museum
              "Negroli's secret was his 'multi-layered support': lead mixed with beeswax and rosin, a viscosity- and elastic-controlled resin, heated to 60-70°C to become viscous but not fluid."
              It's impressive that it's possible to create such a multilayered "pie" with controlled viscosity and elasticity. It's not a homogeneous structure. You could certainly delve into the details and try to find specialized articles on this topic, but that's just too much trouble.
              1. 0
                17 March 2026 11: 59
                Negroli's secret lay in its "multi-layered backing":

                The secret here is in the craftsmanship. Having done this kind of work, you need a very developed sense of metal to understand that if you hit it again, it'll break, and the whole thing will be thrown away. And the backings and the like are a "secret secret" for the uninitiated—you have to somehow briefly describe a process that takes years to master.
                1. 0
                  17 March 2026 12: 05
                  Again, with such deep drawing of "high-carbon steel," as mentioned here, several annealings are necessary, and the more complex the relief, the more difficult the annealing. Nowadays, a muffle furnace does this, but back then, it was purely skill.
                  Steel at that time was very uneven in quality - also a serious problem for the minter.
                2. +1
                  17 March 2026 12: 56
                  Who's arguing? You won't understand until you try it yourself.
                  Moreover, comments to the article do not imply a super-detailed examination of questions "on the one hand," "on the other hand," "most likely," etc.
                  There's also some clarification about tin; it's a very complicated story with many interpretations. Of course, it would be more accurate to say "tin was used during the finishing process." But out of the nearly 1700 people who read this, only you had a question. When I have time, I'll come up with a more detailed answer.
              2. 0
                19 August 2026 00: 00
                It seems to me that this isn't a lead-wax alloy (hard to imagine), but a lead plate generously coated with wax and then covered with a thin layer of rosin. The lead is soft—it's for absorbing impacts and drawing metal. The wax is for easier separation of the steel from the lead (especially if the relief is deep and has reverse slopes). Rosin... Isn't that supposed to be a very brittle resin? But it's sometimes used to increase FRICTION. Perhaps to further bond the steel sheet to the lead?

                How did you make the lining for the helmets? What kind of wooden mold was needed?
      2. +2
        16 March 2026 17: 51
        Quote: balabol
        Time was found towards evening

        Thank you! Your additions are often as enjoyable as the author's wonderful photos...

        The sheets were cut out along the approximate contours of the future armor elements (chest, back, shoulders, etc.)

        For those less brilliant than Negros, there is a wonderful book by Paul Blackwell, "Basic Armoring - A Practical Introduction to Armor Making," which had at least two editions, in 1986 and 2002, very informative for those interested in such weapons.
        1. +2
          16 March 2026 19: 52
          Thanks. If something's bothering you, you can search for information on the topic. It's about 10 characters long, so it's not hard to put together a comment.
      3. 0
        18 August 2026 23: 41
        Sorry, but I'm confused... "The craftsman worked from the backing, not the front." These are probably some technical terms. I understand that "to hammer from the backing" means to hammer from the SIDE of the soft backing onto the steel sheet, but that seems like nonsense. But hammering the metal INTO the backing seems correct, but why is it called "working from the backing"?
        1. 0
          19 August 2026 10: 15
          You're quite the meticulous reader. A quarter ago, I quickly collected materials from foreign sources, quickly machine-translated them, and cobbled together a commentary. Of course, there are some inconsistencies and errors. The description below is more accurate, and the reference in that place means from the inside.
          However, I'm no expert, I've never held a chasing tool in my hands, and my understanding of the process is purely bookish. But even in a simple task, once you get started, a host of subtleties are revealed.
      4. 0
        1 September 2026 22: 02
        Step 2: Making the Backing
        The substrate consisted of mixture of lead (60%), beeswax (30%) and cypriot rosin (10%).
        The mixture was heated to 60–70 °C, a temperature at which it became viscous, like plasticine, but not fluid.
        Step 6: Removing the Backing
        After the embossing was completed, the armor was cooled to room temperature.
        The substrate was heated to 80–90 °C – the lead melted, the wax and rosin softened.

        Sorry, but this is complete nonsense. fool
        Before you publish something that you're as ignorant of as a pig is of oranges, look up the melting point of lead.
        The lead melts, but the wax and rosin only soften.
  7. +2
    16 March 2026 17: 25
    The J. Paul Getty Museum
    Negroli's secret lay in his "multilayer backing": lead mixed with beeswax and rosin was heated to 60–70°C to become viscous but not runny. A thin (1,2–1,5 mm) high-carbon steel was laid on this backing, and only then did the embossing begin. The backing absorbed the impact energy, preventing the metal from breaking, and allowed for reliefs up to 12–18 mm deep—10 times deeper than those produced by other gunsmiths.

    Dr. Timothy G. H. Smith, European Arms and Armor: The Influence of the Italian Renaissance,
    Metropolitan Museum
    "Negroli used a unique technique called 'controlled tension reverse hammering': the steel was clamped to a frame under slight pre-tension to prevent deformation under impact. This allowed him to create complex anatomical shapes—for example, the curve of Hercules' back—without losing strength. The chisels he used were made of hardened bronze and had a radius of curvature that precisely matched the contours of the body."
    — Dr. Stuart Pierre,

    Erwart Oakeshott
    "Negroli didn't use casting, engraving, or stamping—he worked exclusively with chisels and hammer blows. His secret was that he didn't "push out" the relief, but "pulled" the metal from within, as if it were dough. This required not only physical strength but also an intuitive understanding of the crystalline structure of steel."

    Encyclopædia Britannica
    "Negroli used exclusively hand tools—hardened bronze chisels and steel hammers—and no presses or mechanical devices. His technique was so complex that even after his death, no master was able to reproduce his reliefs without destroying the metal."
  8. +3
    16 March 2026 17: 50
    However, I have this question: how long did it take to produce such a piece of top fashion of that century? And how much did such lovely, elegant pieces cost, compared to the same Henry VIII armor from previous articles? Which, at least, was used as actual armor in tournaments, and not from the Milanese Armorprom factory?
    I think I'm beginning to understand the depth of Ramses II's thoughts, as well as Charles V's. They were preparing for the afterlife. And you were right – we remember them, the former largely because of his artifacts, the latter largely because of them.
    And other proven forms of afterlife, other than the fact that they are remembered, have not yet been discovered.
    1. +1
      16 March 2026 18: 58
      I've found similar data before and posted it in one of the comments with examples. About a year and a half ago.
    2. +2
      16 March 2026 19: 44
      1. Armor of King Henry II of France
      Workshop: Filippo Negroli (Milan)
      Year: Circa 1545–1550
      Stored at Musée de l'Armée, Paris

      Features:
      Engraving with silver and gold inlay
      Polychrome elements (blackening + colored enamels)
      Estimated production time: 15-18 months
      Commissioned during the king's lifetime as ceremonial armour
      2. Armor of Emperor Charles V
      Workshop: Pompeo della Cesa (Milan)
      Year: Circa 1530–1540
      Stored at: Kunsthistorisches Museum, Vienna

      Features:
      Rich relief engraving
      Silver and gold inlay
      Application of the niello technique (black filling)
      Production time: 12–16 months
      3. Ceremonial armor for Francis I
      Workshop: Filippo Negroli
      Year: Circa 1520–1525
      Stored at: Metropolitan Museum of Art, New York

      Features:
      Grotesque engraving
      Silver inlay on a black background
      Complex design with many moving parts
      Estimated production time: 1 year
      4. Armor of Duke Cosimo I de' Medici
      Workshop: Pompeo della Cesa
      Year: Circa 1550–1560
      Stored at: Museo degli Argenti, Florence

      Features:
      Silver inlay on a dark background
      Elements of Renaissance ornament
      Produced in two stages: base → decor
      Production time: 14–18 months
      5. Armor for Prince Philip (the future Philip II of Spain)
      Workshop: Filippo Negroli
      Year: Circa 1545
      Stored at: Royal Armory, Madrid

      Features:
      High level of detail
      Engraving depicting battles and allegories
      Silver inlay and black background
      Estimated production time: 1,5 years
      1. +1
        16 March 2026 20: 45
        Thank you, that's exhaustive. A year and a half of such handcrafted work, even by experienced craftsmen—I think that's fast. As for the price, I'd imagine it would be about the size of a region with an estate, 20-30 villages, and several thousand peasants. For one piece. Or Columbus's three ships, loaded with water and provisions, and with their assembled crews.
        1. +4
          16 March 2026 22: 16
          The cost of goods, including armor (and expensive expenses were carefully recorded), is easier to find in historical sources, BUT! It's not a trivial task to attribute the mentioned coins, their weights in gold or silver, and link them to place and time (this is a quest that requires a great deal of knowledge, since even coins with the same name had different weights of precious metal in different regions at the same time), calculate their purchasing power, and only then can one determine whether they were worth much or little.
          There's a medieval expert on the site named Anton, and he knows more about money.