Battle of Dogger Bank. Test of strength before the battle of Jutlad
In the new material from the creators of World of Warships, read about the demonstration battle of the First World War, as a result of which two admirals lost their posts at once.
During the First World War, Great Britain and Germany became the main rivals in the struggle for the sea. It was these two countries that had the strongest fleets in Europe. But the preponderance of power was on the side of the British. In order to somehow equalize the chances, the German naval command was going to lure out the enemy's fleet and break it up piece by piece.
Since the mine laying and submarine operations did not help, it was decided to resort to shelling the British Isles. Already in November 1914, a detachment of battle cruisers from the 1st Reconnaissance Group bombed Yarmouth. A month and a half later, the raid was repeated. This time the coastal towns of Hartlepool, Scarborough and Whitby were attacked. Thus, the Germans wanted to lure out part of the British fleet in order to neutralize the enemy's numerical advantage. After all, the cover of the battle cruisers was carried out by the forces of the entire Open Sea Fleet.
Realizing that this would not be the last raid of the enemy, the British Admiralty began to retaliate. So, a squadron of battle cruisers Grand Fleet under the command of Vice Admiral David Beatty relocated to Rosyth. This would make it possible to react more quickly to the next raid. In addition, since November 1914, "Room 40", a special unit for decrypting and analyzing German radio communications, worked at the Admiralty. The British knew about the impending raid. But they missed the fact that in addition to the battle cruisers, all the German dreadnoughts went to sea. The exact purpose of the operation on the British coast also remained unknown.
With the beginning of 1915, the command of the German Navy developed another operation - laying mines at the entrance to the Firth of Forth. The main work was given to the cruisers, and their cover fell on the shoulders of the line forces. However, the weather spoiled further plans. Successive storms did not allow the German ships to leave the bases. The command decided not to waste time: the battle cruiser Von der Tann went for scheduled repairs, and the most modern dreadnoughts of the 3rd squadron went to the Baltic Sea for exercises. Thus, in the 1st reconnaissance group there were only 3 battle cruisers, and only 7 dreadnoughts, and even not the newest ones, could support them.
The Commander-in-Chief of the High Seas Fleet did not want to conduct operations with the forces of one battle cruiser. But on January 23, the weather suddenly improved, and the admiral gave the order for the ships to go to sea. In the course of the operation, it was necessary to eliminate British fishing trawlers from Dogger Bank, which, as the Germans believed, were engaged in reconnaissance and tracking the actions of the German fleet, transmitting data by radio. Under favorable circumstances, it was ordered to take the enemy's patrol light forces by surprise. This decision was also influenced by the fact that, according to intelligence, the Grand Fleet recently went to sea and was currently supposed to replenish coal reserves at its bases. The commander of the 1st Reconnaissance Group, Admiral Franz Hipper, was sent a radiogram announcing the start of the operation. In the evening of the same day, a German squadron consisting of 3 battle cruisers (Seydlitz, Moltke, Derfflinger), 1 armored cruiser (Blucher), 4 light cruisers (Kolberg, Stralsund, Rostock, Graudenz) and 18 destroyers went to sea.
Meanwhile, at the British Admiralty, Room 40 has already provided a transcript of the German radiogram. It was clear where the enemy ships had gone and in what quantity. Therefore, the interception plan was outlined very quickly. For this, squadrons of Admirals Beatty and Moore were involved (his squadron was subordinate to Beatty): the battle cruisers Lion, Tiger, Princess Royal, New Zealand, Indomitable and 4 light cruisers. At 7 a.m. on January 24 at Dogger Bank, Beatty was supposed to meet with a detachment of Commodore Tyrwitt's Harwich Forces (3 cruisers, 35 destroyers), marching from the south. Plus, the forces of the 3rd cruiser squadron moved north-west of this area to meet the Germans in case of their movement to the north. Four submarines were dispatched to intercept the Germans should they retreat to their bases. Admiral Jellicoe with the main forces of the Grand Fleet departed Scapa Flow at 21:00 on 23 January.
Shortly after 7 a.m. on January 24, a three-pipe cruiser and 4 destroyers were sighted from the British light cruiser Aurora. It turned out to be the German cruiser Kolberg, which first responded to the light signal to name herself, and then opened fire. During a short duel, he hit the Briton with 3 shells, but he himself received a couple of hits. After reports from the cruiser about numerous smoke in the north and northeast, Admiral Hipper decided not to risk it, moving forward in the dark, but to turn to the southeast and wait for dawn. A few minutes later, a message came from the cruiser Blucher, which reported the discovery of several light cruisers and destroyers behind the formation. The German cruiser, which was sailing the end, briefly opened fire, driving off the close approaching British destroyers.
The Blucher could only reach a speed of 23 knots. He was soon within range of the faster battlecruisers Beatty's guns. Hipper, too, understood the danger his armored cruiser was in. He ordered his ships to rebuild in the bearing formation in order to be able to meet the enemy with fire from all guns. At 9:11 am, the battle of the line forces began.

Three British battlecruisers fired on Blucher from 09:05 to 09:24, then Lion switched to Derfflinger, and at 09:35 Beatty ordered each of his ships to fire on the enemy ship opposite in formation. The Germans focused on the Lion flagship. At 10:18 the British battle cruiser received two hits below the waterline. But there was damage from the German side as well. Hipper's flagship, Seydlitz, came under fire from Lion and Tiger after 09:35. One of the 343-mm shells from British ships pierced the deck and exploded against the barbette armor of the stern tower. As a result of the explosion, powder charges flared up in the reloading charging compartment. The force of the powder flame extremely quickly burned out the compartment, the aft tower, the next compartment and the second aft tower, killing 159 people, both towers were disabled. The battle cruiser could have died if not for the decisive actions of three sailors, led by the ship's senior officer, corvette captain Hagedorn, who opened the emergency flooding valves of the cellars. But the Germans did not remain in debt either. The battle cruiser Lion received 14-15 hits and by 10:45 had left the head of the column. He took 3 thousand tons of water, received a roll of 10 degrees to the port side. Soon the machine on this side was out of order and the speed dropped to 15 knots, the ship was deprived of electricity. The starboard turbine had to be stopped later, after leaving the battle, due to the salinization of the boilers with seawater. Lion zigzagged to shoot down the sight of the German gunners.
The battle continued, and the superiority in forces on the side of the British was affecting more and more. Closing line Blucher received one hit after another. The armored cruiser began to lose speed, and a strong fire raged in the area of the side towers. Admiral Hipper did not want to abandon one of his ships, but he could not risk his battle cruisers either. Nevertheless, they fired on the British until they left the firing zone. During this time, the Germans managed to hit Lion again. Due to an erroneous report of a fire in the area of the powder magazines, an artillery magazine was partially flooded. Nevertheless, the British commander ordered an attack on the outgoing enemy battlecruisers. In turn, Admiral Moore understood the signal in his own way - all the battle cruisers that he commanded focused their fire on the German armored cruiser.
Left alone, Blucher managed to damage one destroyer, but after being hit by two torpedoes from the cruiser Arethusa at 11:38 it ceased fire. And at 11:45 am, Thirwitt reported that Blucher had lowered the flag. The ship had already lost control and was describing circulation. Its fire control systems were destroyed, and most of the artillery did not function. And exactly at 12:13 the German cruiser went on board and sank. The British rescued 281 German sailors.

Admiral Beatty left his flagship and transferred first to destroyer Attack at 11:25 am and then, at 12:20 pm, to Princess Royal. Then he was able to assess the situation and realized that trying to catch up with the German battle cruisers was already pointless. The British squadron headed home. At the same time, Lion finally lost its course, and had to be towed.
This battle ended in a decisive victory for the Grand Fleet. On the German side, the armored cruiser Blucher was lost, and the battle cruiser Seydlitz was seriously damaged. About 1000 German sailors were killed in the battle. The losses of the British were significantly less: the battle cruiser Lion and one of the destroyers were damaged, 14 people were killed and 29 were wounded.
In the Admiralty, conducting a detailed analysis of the battle, they made the following conclusions: having an overwhelming superiority over the Germans, the British were able to sink only one ship, which was the weakest in the squadron. Admiral Moore was found guilty for misinterpreting Beatty's orders. Having every chance of catching up with the fleeing German battlecruisers, the admiral stopped pursuing. Poor firing of British ships was also noted, in particular, the senior gunner of the battle cruiser Tiger was removed. In addition, the vulnerability of the turret charging compartments was noted, but no measures were taken to eliminate it. A year later, in the Battle of Jutland, this omission will cost the British 3 battle cruisers.
The Germans, in turn, worked on the mistakes. Changes were made to the design of the ships under construction to prevent their death due to an explosion of ammunition. Rangefinders have been improved. Not without a search for the culprits: von Ingenol, commander of the High Seas Fleet, lost his position. However, the Germans did not manage to understand that their radio messages were decrypted.
Despite the results, this battle did not change the course of the war. The balance of power remained at the same level, and a decisive battle for supremacy in the sea was ahead.
By the way, the fast and versatile cruisers of the Kolberg type entered service shortly before the start of the war. They were developed as the main combat units of the Kaiser's fleet. You can get to know history this ship by watching a video from Wargaming.
During the First World War, Great Britain and Germany became the main rivals in the struggle for the sea. It was these two countries that had the strongest fleets in Europe. But the preponderance of power was on the side of the British. In order to somehow equalize the chances, the German naval command was going to lure out the enemy's fleet and break it up piece by piece.
Since the mine laying and submarine operations did not help, it was decided to resort to shelling the British Isles. Already in November 1914, a detachment of battle cruisers from the 1st Reconnaissance Group bombed Yarmouth. A month and a half later, the raid was repeated. This time the coastal towns of Hartlepool, Scarborough and Whitby were attacked. Thus, the Germans wanted to lure out part of the British fleet in order to neutralize the enemy's numerical advantage. After all, the cover of the battle cruisers was carried out by the forces of the entire Open Sea Fleet.

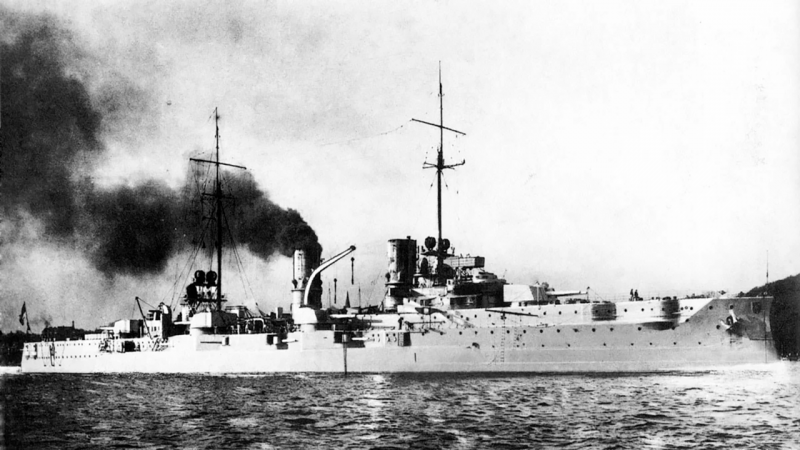
German armored cruiser Blucher is the only victim of the battle at Dogger Bank
Realizing that this would not be the last raid of the enemy, the British Admiralty began to retaliate. So, a squadron of battle cruisers Grand Fleet under the command of Vice Admiral David Beatty relocated to Rosyth. This would make it possible to react more quickly to the next raid. In addition, since November 1914, "Room 40", a special unit for decrypting and analyzing German radio communications, worked at the Admiralty. The British knew about the impending raid. But they missed the fact that in addition to the battle cruisers, all the German dreadnoughts went to sea. The exact purpose of the operation on the British coast also remained unknown.
With the beginning of 1915, the command of the German Navy developed another operation - laying mines at the entrance to the Firth of Forth. The main work was given to the cruisers, and their cover fell on the shoulders of the line forces. However, the weather spoiled further plans. Successive storms did not allow the German ships to leave the bases. The command decided not to waste time: the battle cruiser Von der Tann went for scheduled repairs, and the most modern dreadnoughts of the 3rd squadron went to the Baltic Sea for exercises. Thus, in the 1st reconnaissance group there were only 3 battle cruisers, and only 7 dreadnoughts, and even not the newest ones, could support them.
The Commander-in-Chief of the High Seas Fleet did not want to conduct operations with the forces of one battle cruiser. But on January 23, the weather suddenly improved, and the admiral gave the order for the ships to go to sea. In the course of the operation, it was necessary to eliminate British fishing trawlers from Dogger Bank, which, as the Germans believed, were engaged in reconnaissance and tracking the actions of the German fleet, transmitting data by radio. Under favorable circumstances, it was ordered to take the enemy's patrol light forces by surprise. This decision was also influenced by the fact that, according to intelligence, the Grand Fleet recently went to sea and was currently supposed to replenish coal reserves at its bases. The commander of the 1st Reconnaissance Group, Admiral Franz Hipper, was sent a radiogram announcing the start of the operation. In the evening of the same day, a German squadron consisting of 3 battle cruisers (Seydlitz, Moltke, Derfflinger), 1 armored cruiser (Blucher), 4 light cruisers (Kolberg, Stralsund, Rostock, Graudenz) and 18 destroyers went to sea.

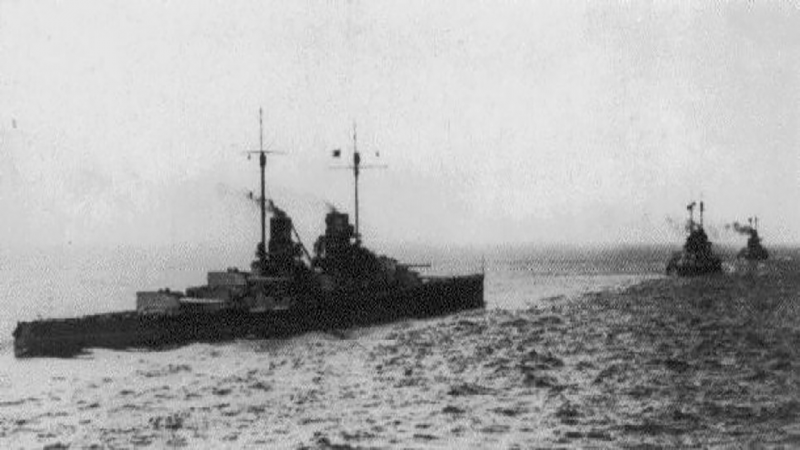
German battlecruisers Seydlitz, Moltke and Derfflinger at sea
Meanwhile, at the British Admiralty, Room 40 has already provided a transcript of the German radiogram. It was clear where the enemy ships had gone and in what quantity. Therefore, the interception plan was outlined very quickly. For this, squadrons of Admirals Beatty and Moore were involved (his squadron was subordinate to Beatty): the battle cruisers Lion, Tiger, Princess Royal, New Zealand, Indomitable and 4 light cruisers. At 7 a.m. on January 24 at Dogger Bank, Beatty was supposed to meet with a detachment of Commodore Tyrwitt's Harwich Forces (3 cruisers, 35 destroyers), marching from the south. Plus, the forces of the 3rd cruiser squadron moved north-west of this area to meet the Germans in case of their movement to the north. Four submarines were dispatched to intercept the Germans should they retreat to their bases. Admiral Jellicoe with the main forces of the Grand Fleet departed Scapa Flow at 21:00 on 23 January.
Shortly after 7 a.m. on January 24, a three-pipe cruiser and 4 destroyers were sighted from the British light cruiser Aurora. It turned out to be the German cruiser Kolberg, which first responded to the light signal to name herself, and then opened fire. During a short duel, he hit the Briton with 3 shells, but he himself received a couple of hits. After reports from the cruiser about numerous smoke in the north and northeast, Admiral Hipper decided not to risk it, moving forward in the dark, but to turn to the southeast and wait for dawn. A few minutes later, a message came from the cruiser Blucher, which reported the discovery of several light cruisers and destroyers behind the formation. The German cruiser, which was sailing the end, briefly opened fire, driving off the close approaching British destroyers.
The Blucher could only reach a speed of 23 knots. He was soon within range of the faster battlecruisers Beatty's guns. Hipper, too, understood the danger his armored cruiser was in. He ordered his ships to rebuild in the bearing formation in order to be able to meet the enemy with fire from all guns. At 9:11 am, the battle of the line forces began.
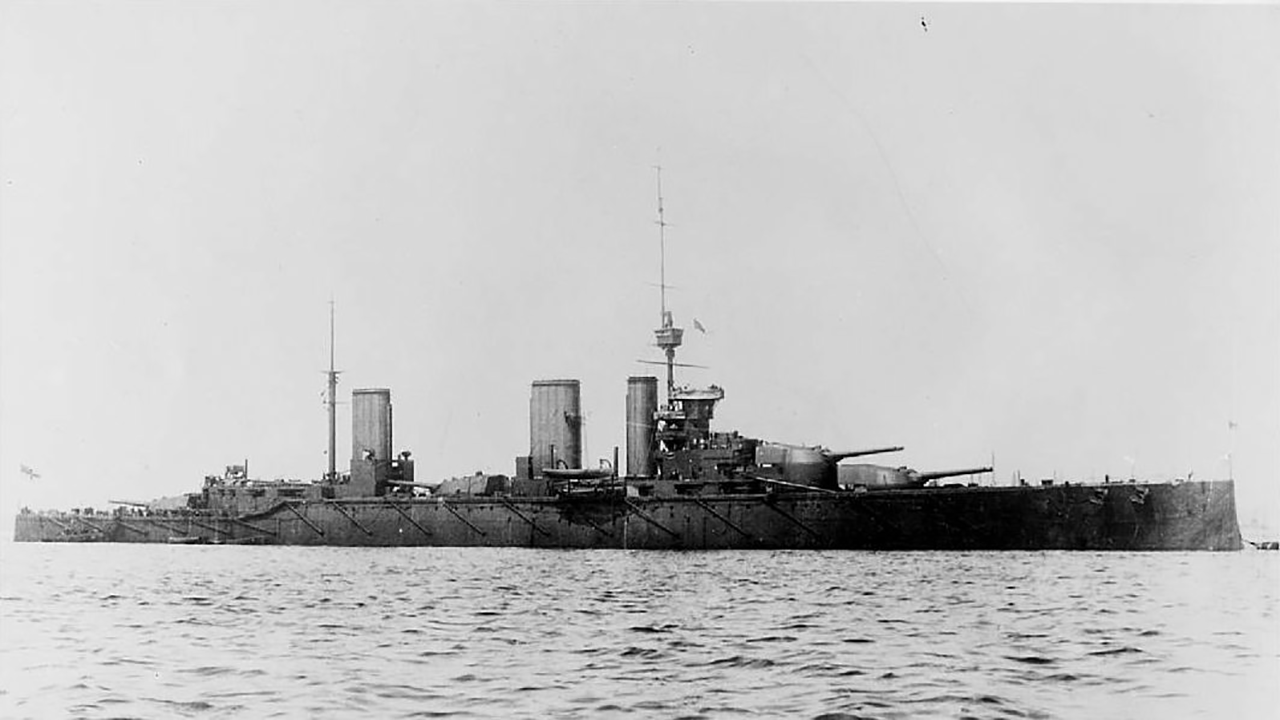
Battle cruiser Lion - Admiral Beatty's flagship
Three British battlecruisers fired on Blucher from 09:05 to 09:24, then Lion switched to Derfflinger, and at 09:35 Beatty ordered each of his ships to fire on the enemy ship opposite in formation. The Germans focused on the Lion flagship. At 10:18 the British battle cruiser received two hits below the waterline. But there was damage from the German side as well. Hipper's flagship, Seydlitz, came under fire from Lion and Tiger after 09:35. One of the 343-mm shells from British ships pierced the deck and exploded against the barbette armor of the stern tower. As a result of the explosion, powder charges flared up in the reloading charging compartment. The force of the powder flame extremely quickly burned out the compartment, the aft tower, the next compartment and the second aft tower, killing 159 people, both towers were disabled. The battle cruiser could have died if not for the decisive actions of three sailors, led by the ship's senior officer, corvette captain Hagedorn, who opened the emergency flooding valves of the cellars. But the Germans did not remain in debt either. The battle cruiser Lion received 14-15 hits and by 10:45 had left the head of the column. He took 3 thousand tons of water, received a roll of 10 degrees to the port side. Soon the machine on this side was out of order and the speed dropped to 15 knots, the ship was deprived of electricity. The starboard turbine had to be stopped later, after leaving the battle, due to the salinization of the boilers with seawater. Lion zigzagged to shoot down the sight of the German gunners.
The battle continued, and the superiority in forces on the side of the British was affecting more and more. Closing line Blucher received one hit after another. The armored cruiser began to lose speed, and a strong fire raged in the area of the side towers. Admiral Hipper did not want to abandon one of his ships, but he could not risk his battle cruisers either. Nevertheless, they fired on the British until they left the firing zone. During this time, the Germans managed to hit Lion again. Due to an erroneous report of a fire in the area of the powder magazines, an artillery magazine was partially flooded. Nevertheless, the British commander ordered an attack on the outgoing enemy battlecruisers. In turn, Admiral Moore understood the signal in his own way - all the battle cruisers that he commanded focused their fire on the German armored cruiser.
Left alone, Blucher managed to damage one destroyer, but after being hit by two torpedoes from the cruiser Arethusa at 11:38 it ceased fire. And at 11:45 am, Thirwitt reported that Blucher had lowered the flag. The ship had already lost control and was describing circulation. Its fire control systems were destroyed, and most of the artillery did not function. And exactly at 12:13 the German cruiser went on board and sank. The British rescued 281 German sailors.
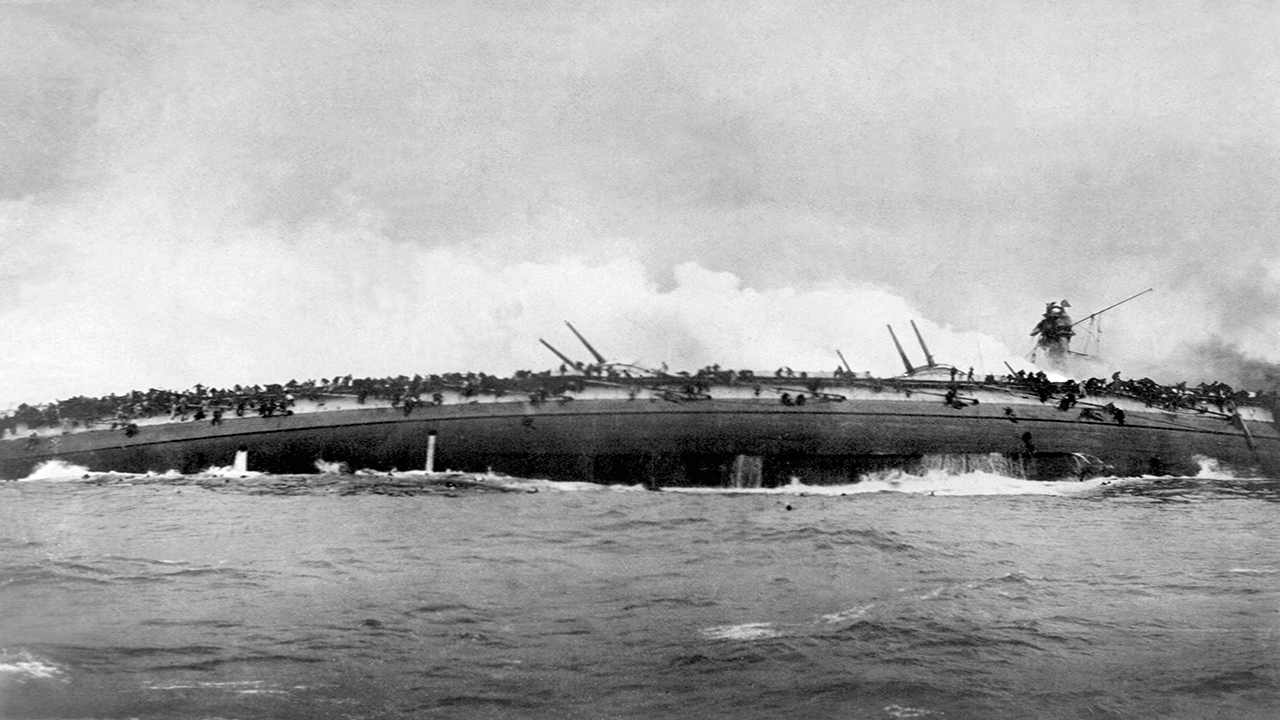
The last moments of the life of the armored cruiser Blucher
Admiral Beatty left his flagship and transferred first to destroyer Attack at 11:25 am and then, at 12:20 pm, to Princess Royal. Then he was able to assess the situation and realized that trying to catch up with the German battle cruisers was already pointless. The British squadron headed home. At the same time, Lion finally lost its course, and had to be towed.
This battle ended in a decisive victory for the Grand Fleet. On the German side, the armored cruiser Blucher was lost, and the battle cruiser Seydlitz was seriously damaged. About 1000 German sailors were killed in the battle. The losses of the British were significantly less: the battle cruiser Lion and one of the destroyers were damaged, 14 people were killed and 29 were wounded.
In the Admiralty, conducting a detailed analysis of the battle, they made the following conclusions: having an overwhelming superiority over the Germans, the British were able to sink only one ship, which was the weakest in the squadron. Admiral Moore was found guilty for misinterpreting Beatty's orders. Having every chance of catching up with the fleeing German battlecruisers, the admiral stopped pursuing. Poor firing of British ships was also noted, in particular, the senior gunner of the battle cruiser Tiger was removed. In addition, the vulnerability of the turret charging compartments was noted, but no measures were taken to eliminate it. A year later, in the Battle of Jutland, this omission will cost the British 3 battle cruisers.
The Germans, in turn, worked on the mistakes. Changes were made to the design of the ships under construction to prevent their death due to an explosion of ammunition. Rangefinders have been improved. Not without a search for the culprits: von Ingenol, commander of the High Seas Fleet, lost his position. However, the Germans did not manage to understand that their radio messages were decrypted.
Despite the results, this battle did not change the course of the war. The balance of power remained at the same level, and a decisive battle for supremacy in the sea was ahead.
By the way, the fast and versatile cruisers of the Kolberg type entered service shortly before the start of the war. They were developed as the main combat units of the Kaiser's fleet. You can get to know history this ship by watching a video from Wargaming.
Information